What is Reactive Programming?

Reactive : rɪˈaktɪv/

Showing a response to a stimulus.

A response to an action

The newest programming trend.

So already we have Multi-paradigm programming, do we need know about it ? YES.

We have acquired lot of knowledge on different frameworks and different languages.But for the past 2 decades as far as i know we are using the same programming paradigm which haven’t changed.

Reactive extensions are used by Microsoft,Netflix as internal project. The problem Netflix people faced is that their products are based on streaming they observed that there’s a gap to fill between client and server which is latency.

Example:

Consider this scenario user have 4 gb ram and 40 mbps of internet connection . And opened your application there comes the splashcreen for 5 seconds and selects language preference a network call will be sent you wait for another 5 seconds, goes to tv shows and selects his fav TV another network call with progress bar.

User will uninstall the app in the next minute.

Consider another scenario as an android developer we tend to make lot of network calls. What if user makes a network call and moves out from the screen ? Your app will gets back data from server with lot of excitement and TADA! User is not on that screen! So we have wasted resources of the user’s mobile which commonly are network bandwidth, ram , blah blah.

Multi-paradigm programming

Multi paradigms are combination of many paradigms such as Object orientedor Imperative programming .Iterator is best example, It pulls the data from list or whatever data you pass it it. A traditional CRUD operations can also be considered.

It’s like your cat, doesn’t cares. it comes when it wants but not when you want.

Reactive programming

Client subscribes to the data and it won’t ask for it, Whenever there’s a change in data the server pushes the data to client.

It’s like your dog, lots of love immediately.

What makes difference using reactive programming ?

Event driven:

Example : You are writing a story in Medium, you suddenly closed the tab. Does it loses data ? NO. As it is event driven for every word you type there’s an event triggered and being saved, Same thing with the Google Docs.

But if you look applications like MS office which is developed on imperative paradigm, you need to save the data every time when you make change it, if there’s any power failure’s your work will all be gone by the time you start your system.

But in reactive programming everything is event driven as an example look at the applications like Google keep or Medium, you type the data for every space the data is getting saved. Pretty nice is n’t it ?

Resilient :

In object oriented programming you write lot of call backs to which will become real mess when you debug.Remember last time when you debugged your code with call backs within call back!!! But the error handling in Reactive programming is kind of hassle free.

That’s all folks. If you like this article please do share.

Think twice code once.

Originally posted Medium
Android Project Structure-Part 2

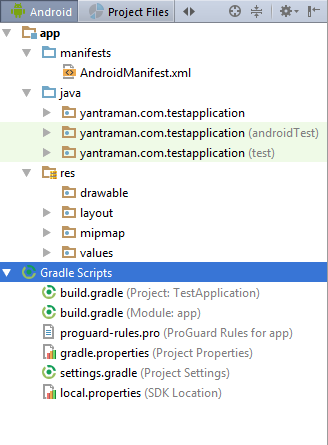
On the previous post we briefly discussed about project structure. Now let’s look into Gradle Scripts .


Gradle:
Gradle is a build system where you write script in groovy language to get a work done such as compiling module in your application.Which means it take cares all the work for building an .apk file like your bike engine. The latest version of the gradle is 2.13.

Project_Sturture

In the above image you can see that there are two gradle files.

  1. build.gradle(Project: TestApplication)
  2. build.gradle(Module: app)

The first one’s source code looks something like this :

// Top-level build file where you can add configuration options common to all sub-projects/modules.
buildscript {
    repositories {
        jcenter()
    }
    dependencies {
        classpath 'com.android.tools.build:gradle:2.1.0'

        // NOTE: Do not place your application dependencies here; they belong
        // in the individual module build.gradle files
    }
}

allprojects {
    repositories {
        jcenter()
    }
}

task clean(type: Delete) {
    delete rootProject.buildDir
}

There’s something called jcenter()  inside of repositories which is a central repository of almost all third party lib. From there you fetch the lib to your project. In eclipse days we always have to download  .jar files from somewhere and include it to our projects. Now Google made our work easier you will just specify the name of the lib it will fetch it and includes for you. The including part is in second gradle file.

It looks something like this:

apply plugin: 'com.android.application'

android {
    compileSdkVersion 23
    buildToolsVersion "23.0.2"

    defaultConfig {
        applicationId "test.gtm.com.sample"
        minSdkVersion 11
        targetSdkVersion 23
        versionCode 1
        versionName "1.0"
    }
    buildTypes {
        release {
            minifyEnabled false
            proguardFiles getDefaultProguardFile('proguard-android.txt'), 'proguard-rules.pro'
        }
    }
}

dependencies {
    compile fileTree(include: ['*.jar'], dir: 'libs')
    testCompile 'junit:junit:4.12'
    compile 'com.android.support:appcompat-v7:23.4.0'
    compile 'com.google.code.gson:gson:2.2.4'
    compile 'com.squareup.picasso:picasso:2.3.2'
}

apply plugin: ‘com.android.application’  :  Which specifies that your module is an android project or library module. If it is lib it should be : apply plugin: ‘com.android.library’

And you specify the compileSdkVersion: which specifies on which version of sdk you want to compile the code. And buildToolsVersion: which specifies on which version of compilers you want to use.

Gradle build will be unsuccessful if you’re trying to build without compileSdkVersion and  buildToolsVersion. 

defaultConfig {
applicationId “test.gtm.com.sample” // Is your applicationId used for generating different flavours of build. 
minSdkVersion 11 
targetSdkVersion 23
versionCode 1
versionName “1.0”
}

So applicationId is very important to ship your application to the playstore.And it should be unique.
dependencies {
compile ‘com.android.support:appcompat-v7:23.4.0’
compile ‘com.google.code.gson:gson:2.2.4’
compile ‘com.squareup.picasso:picasso:2.3.2’
}

Dependencies: 

You write a single line of code which delivers you a lib which is written by geeks.How simple is that :), beauty of using android studio and gradle.

compile ‘com.squareup.picasso:picasso:2.3.2’

The above line fetchs the picasso lib for you from jcenter to your lonccal working system.Also you can include your own modules here.

This is all about gradle for now !

Sources :
https://developer.android.com/studio/build/index.html
http://stackoverflow.com/a/24828666
http://gradle.org/

“Remembering that you are going to die is the best way I know to avoid the trap of thinking you have something to lose. You are already naked. There is no reason not to follow your heart “- Steve Jobs

Happy coding !

Android Project Structure -Part 1

Back in 2012 i was learning android those days we used eclipse as main IDE. The project was slightly different from Android Studio. There are many changes happened took over the major change was build system previously it was Ant and now Gradle. 

In eclipse developer doesn’t have any control over the build but in gradle developer control things like which third party lib has to compile and which has to ignore.

Now let’s look into structure of the project.

Project_Sturture.png

app : is your app where all the project files are included.

  • manifests: is a folder where AndroidManifest.xml  is present.
    AndroidManifest.xml : is a xml file which acts as configuration file for the entire application, which contains package name on which playstore identifies the your application, contains permissions such as android.permission.INTERNET (if your application is accessing internet). And mainly all of your activities should be registered here if not ActivityNotFoundException will thrown when you call startActvitiy(intent).
  • java: where all of your activities and java classes are placed if manifest is heart java classes are brain to application.Which you can also have junit test files which are placed under (test) we will talk about it later.
  • res: is folder where all of your application resources are placed such as images,xml,assests(mp3,mp4 files),values.
    drawables: It is a folder where you place animations, png files, layout transitions etc.,
    layout: All of your UI xml files are displayed here.
    mipmap: Your app’s launcher icon should be placed here.It is exculsively for launcher icons.
    values: This folder contains strings.xml where all of your app’s strings are placed which is mostly used for internatlization and to make any string global for all the classes, your customized colors and diemensions for different orienation screens.

Gradle : Simply it is a build system.

Sample Android App

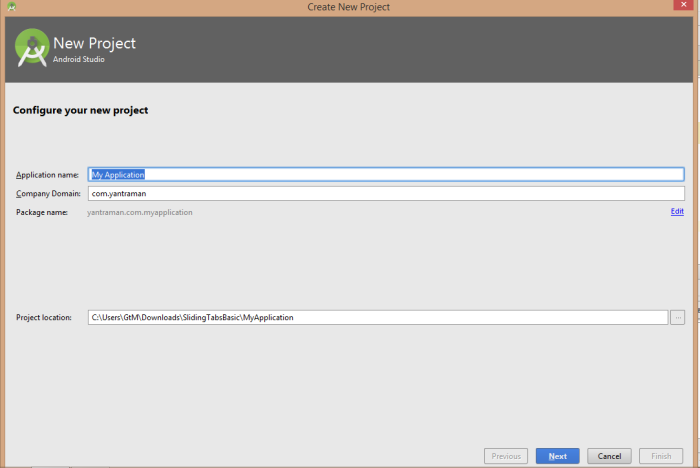
In the previous post we installed android studio and now lets’s loook how to create a sample project and running it successfully.

The following are the simple steps :

Step 1:
File>New>New Project.

You”ll be prompted with a window something like the following where you can choose your application name and package name and project location. 

NewProject

You can edit your application name and package name.

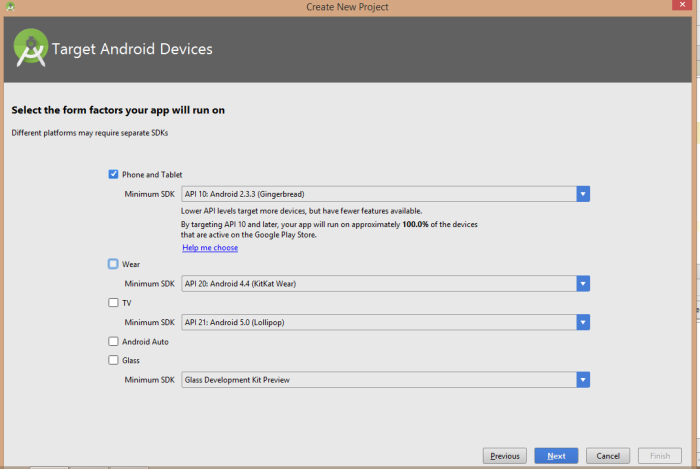
Step 2:

Now you”ll be prompted  to select minimum sdk that your supports. The minimum sdk is on which version of android is minimum to your app.
For Example :
Let’s say you have selected API 10 i.e., Android 2.3.3 . Your app will not be run on lower versions other than Android 2.3.3.

NewProject.png

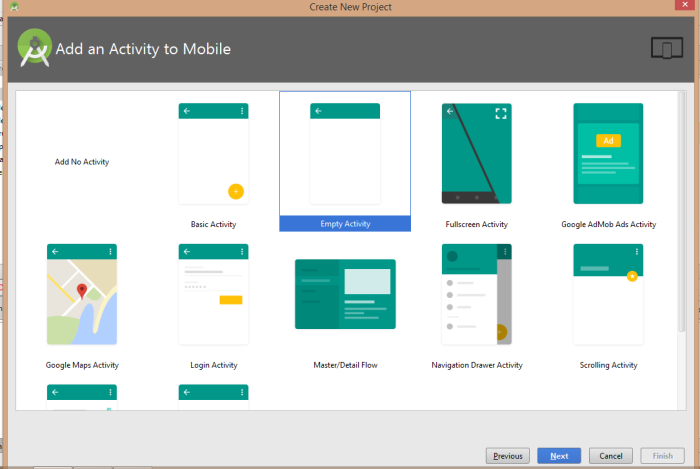
Step 3: 

Next step is to add MainActivity (Entry point of your app)which is going to be starting screen of your app.

NewProject.png

You can choose any one of them as per your requirement in my case i”ll be choosing “Empty Activity“.

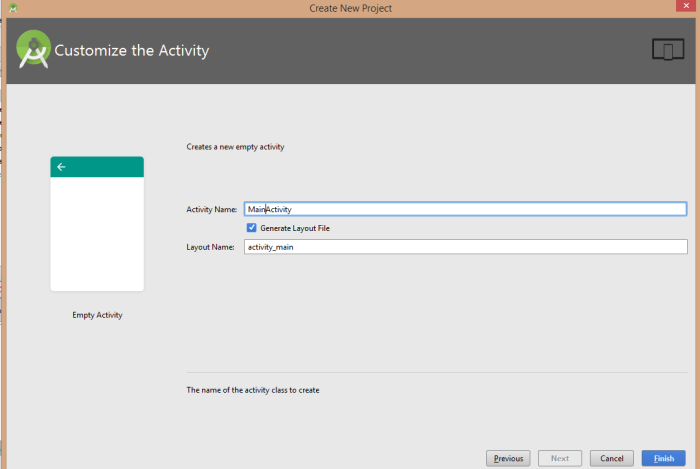
Step 4:

On the next screen you”ll asked to provide the “First Screen Name“. Be default it will be ‘MainActivity‘. As per java naming conventions you don’t have to give spaces between in your class name.And you”ll be asked to give a ‘layoutname‘. A layout is nothing but xml file which holds your  UI widgets like Buttons,TextViews,EditTexts. We’ll be discussing about widgets in coming up posts.Click on Finish 😛.

NewProject.png

A small info will be displayed saying that gradle is building your app. We will disscuss about it later on.

Now you’re ready to write code. Happy Coding !

Getting started to Android Development

Getting started to Android Development

Hey guys. Hope you guys are doing well. And welcome to my first post about android development, Let’s get started.

When i started android development back in 2012 it was not easier to download android related things to your PC. The procedure was something like this : we used to download eclipse and sdk  from developer.android.com and integrating them together after downloading, it was long procedure most of my friends found it was difficult. After all all google came with Android Studio. Which changed the face of android development and it has pretty straight forward way to start with development.

There are few prerequites  i strongly recommend have this prerequites before you get started to android development.

Prerequisites:

1.JDK
2.Make sure you have atleast 1 GB of free space in the drive.

Let’s look into it steps to download:

Step 1:

Go to http://developer.android.com/sdk/index.html and click on download it for Windows. And accept term and conditions.

Step 2:

When the android studio bundle starts downloading you”ll be redirected to http://developer.android.com/sdk/installing/index.html. Where you can see the steps that has to followed for successful installation.

By default the page which shows steps for windows platform you can change it by selecting the drop down which is shown at the right corner of the page.

Instructions.png

And for better understanding you can view the video which is displayed on this page .

That’s all folks you are ready to start programming for android !!!

Introduction to ‘yantraman’…

Introduction to ‘yantraman’…

Who are you ?

Hey… Hi… I’m Gowtham kumar, i work as an android application developer. I’ve been developing android applications since 2012. I love photography and blogging and a batman fan.My interest towards blogging was started when i’m studying my bachelors. I still remember those days were there was group of our friends sit together and planned to launch a website like facebook  (apologies zuck). Anyway we’re no where near to that , somehow ended-up on different domains and the website we wanted to build ? we forgot. 

Why i started ?

What makes difference between animals and humans ? We humans pass our knowledge to our younger generations so that our human race makes our beautiful earth more easily livable and better place to live-in. And i wanted to share what i knew for the younger generation(newbies).Sharing is caring.

Why i choose blogging: 

Because it stays over the internet forever and digitally available for anyone all over the world for needy.

Whom this blog for:

Absolutely for newbies and few posts will be for mid-senior developers too.I’ll try to post related to the day to day issues which i come across so that we can learn together.